Whole House Audio - Small Price / Big Value
Whole House Audio is a really expensive endeavor to start out on. I was shocked how much the “retail” systems cost and had no interest in spending that kind of money while releasing a lot of “control” to the app associated with the system. I had a list of goals and a vision in my mind that I was striving for:
- Multi-zone: 12 zones
- Multi-source: at least three sources
- Remote control: be able to control from my phone when I was on the local LAN
- Local control: be able to control the local audio from the room I was physically in
- Simplistic wiring model
- Centrally locate the components
- Simple interface my family could use without yelling “Dad, how do I get the sound in my room again?”
- Finally, I wanted to spend the least amount of money I could while maintaining an acceptable listening and control experience
The Choice
 I selected the six channel multi-zone amplifier from Monoprice (device manual). The multi-zone amplifier sounds completely acceptable and comes with a amp bridge mode for mono zone control as well. Furthering the controller has a DB9 output and a simplistic serial interface to control the system remotely. The system uses simplistic CAT5 wiring for the keypads and has multiple audio inputs for each zone. It also has another ribbon cable to link multiple controllers together. The home I was building required 12 zones so it fit my situation perfectly. It only provides 25W RMS for 8ohms impedance speakers (which I intended to use 8ohms speakers). I was hoping to get more power but I have yet to be in a position where I wished I had more power at the amp. My children both continue to test the road to clipping and distortion and I have not noticed it being an issue overall. I purchased two of the controllers to power all 12 zones.
To control the system from my phone I needed to link a few things together. In my case I linked to the controllers using a USB to DB9 null serial cable. Getting the right cable ended up being one of the tricky parts. One of the cables I tried did not work - this one does.
| Monoprice 6 Channel Multi-Channel Amplifier | $599 |
| A second Monoprice 6 Channel Multi-Channel Amplifier | $599 |
| Raspberry Pi | $~40 |
| USB to DB9 Serial Cable | $~10 |
| Total | $~1250 |
 Then I needed speakers; I went with the 8” and 6” in-wall / in-ceiling speakers from Polk. They sound great for their price point. I had at least two of these in each room and in three areas I bridged four of them together in mono (more on this later).
| Polk Audio RC80i 8” In-Ceiling | $129.99 |
| Polk Audio RC60i 6” In-Ceiling | $129.99 |
| Total for ALL of the speakers | ~$1950 |
(note: both the RC80i and RC60i are 8ohms total impedance speakers)
Overview of the System
 All of the components for my system are located in a single rack and closet. The multi-zone amplifier controllers and the Raspberry Pi all live in the same rack. Each room has a single keypad wired back to the closet via CAT6 cable. Each speaker set (two or four speakers) are wired via 14guage speaker wire. Two amps are linked via the linking ribbon cable that shipped with the unit and A raspberry.
For controlling I used a Raspberry Pi as a decorator in front of the controllers. I connected it via USB to DB9 and I run on service on the Raspberry Pi which provides a web service for the controller amp. This way I can interface with the web service to control and gain status of the controllers all via the web service.
Wiring
 I was lucky enough to build out this system while I was building my own home so I had skelton walls when I wired the system. I did not have my system selected quite yet when I wired my home and that caused me to wire a bit more aggressively. Here is how I wired it and later I will explain how I could have saved a lot of audio wire.
I wired 4 conductor (2 channel), 14 gauge speaker wire from the closet to each keypad location, then switched cables and ran 2 conductor 14 gauge speaker wire from the keypad to each speaker location. Additionally, I ran CAT6 network cable from the rack to each keypad location.
I wired every zone to a single closet.
Make sure you stay aware of your speaker impedance - in my case I was using 8Ω speakers from Polk. If you want to use the bridging available in the Amp you’ll need to make sure you maintain the 8Ω - you can learn more how I did bridging here.
Wiring to save money
I could have saved a lot of wire by not wiring to the keypads and then going directly to the speakers. However, I feel like wiring to the keypads directly helped me future proof the system at some level. If a new system launches that requires the load at the keypads then I am ready for that update.
Marking the Cables and Completing the Ends
 I labeled each cable with shrink tube labels (which are my absolute favorite way to label cables). I love my DYMO labeler. The result is a clean and highly visible cable label. Six months after you finish your install you are going to forget every detail about which able went where: label them! I used the Dymo 3/8” black-on-white Industrial Heat-Shrink Labels. They work great and I melted the suckers with my favorite heat gun that’s worth every cent you pay for it.
 All of the speaker wire is stranded (or it should be). When you terminate the wire you really should terminate it into a wire ferrule. A wire ferrule or “end terminal” is a very clean way to maintain the bundle of the strands of cable and convert them to a solid conductor to place into the terminating block.
Obtain a set of ferrules that will go into the terminating block. Prepare the cables, crimp on the end terminates and add them into the terminating blocks. The end result is an incredibly clean connection to your speakers. 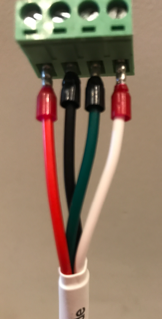
You only need a crimper and the wire ferrules to pull this off and it creates a far superior termination rather than just shoving the stranded wires into the termination block.

Controlling the Controller
In order to digitally control the multi-zone controller I interact with their DB9 serial interface. I interact with the interface via a Raspberry Pi running Raspbian and a Python program to talk to the serial interface. The python program “decorates” the controller and allows me to interact with it via a web interface I created.
You can read more about the decoration here: Decorating the Monoprice 6 Zone Home Audio Multizone Controller
Other Ideas
- Russound D1650 - $999 per controller and I needed two and no way to control it digitally
- Russound CAA66 Controller Kit - this is like the D1650 but has a DB9 serial out; but I needed two of these at $1200
- Sonos - each zone required one of their wireless speakers or a stack of their $600 amps - too costly
- Denon HEOS - similiar issue to the Sonos - too many physical devices to purchase
- Niles MRC-6430 - controllers were $1200, needed two of them - BUT they had an app
- Dayton Audio MA1240a Multi-Zone 12 Channel Amplifier - no DB9 output for external control
The Result
I have a fully functional 12 zone whole-house audio solution that can be controlled not only from the room you are standing in but also via an application I created on my iPhone. The entire system cost me about $3200 which is less than some of the controllers I looked into. Even the cheap systems from HTD were $3999 with the keypads. That’s how I did whole-house sound the way I wanted to!